Cabinetmaker. In 1921 he became one of the founders of the Communist...

Very modest requirements are put forward for a do-it-yourself brick oven. Long breaks between visits, a relatively small volume of heated room, maximum efficiency and the use of local fuel - all these criteria indicate the choice in favor of wood stove. Contrary to popular belief, it is quite possible to make it without the services of a stove-maker. Let us consider in more detail how a small brick oven is designed and built for a summer residence with your own hands.
It is unlikely that you will be able to make a complex and highly efficient stone oven for a brick cottage with your own hands without building experience. Too many nuances and secrets are fraught with the work of a professional stove-maker. But small in size and uncomplicated in design, a vertical stone oven for summer cottages can be built even by an unprepared person. The main thing in this process is to do everything very carefully, carefully and in accordance with our recommendations.
Since the described small brick oven for summer cottages is fired with wood, it is not intended for intense and prolonged heating - it can be folded from ordinary, not refractory bricks. Although, it is better to use heat-resistant material for the combustion chamber.
List and required amount of materials:
For a do-it-yourself wood-fired oven, you need to choose a full-bodied ceramic brick that does not crumble from the middle blow of a hammer, and at the same time does not make a sonorous (this is a red-hot brick), but a booming sound. It is desirable that the side faces of the bricks are smooth.
Clay will be needed for the solution. The stove-makers prefer to choose the "fat" one, from which the solution is soft, like butter, and plastic, like soft plasticine. Such clay for building a do-it-yourself stove can be found in hardware stores or, after consulting with local residents, simply dig up in the area.
With a good oven tool country house built quickly and easily. For work, you should prepare a level, a plumb line, a trowel, a mason's hammer and dishes for preparing a clay solution. To cut bricks, you need a grinder.
Whatever the small brick oven for giving with your own hands - its weight is several hundred kilograms. Therefore, it is impossible to put it on the wooden floor of the room, but you need a foundation.
To choose the right place for the foundation, you need to project the plan of the stove onto the ground so that its pipe falls between the floor beams and the roof logs. If a chimney is provided in the wall of the house, then the stove for the country house should be located near it. When building a new house, the stove in the country can be built into the wall between the rooms. This option is very convenient: both rooms heat up equally quickly, but in one of the rooms, even under the most adverse conditions, there will never be smoke.
The depth of the foundation must exceed the depth of soil freezing. However, if the country house has its own deep foundation, then a combined base can be made at the stove for giving. To do this, four lightweight concrete columns are vertically dug into the ground, such as those used for fences. The posts should protrude from the ground just below floor level.
Between them, right on the surface of the soil, a gravel or sand cushion is poured into half a brick. Then a layer of roofing material or other sheet waterproofing is laid. A reinforcing metal mesh is laid on top, and a concrete foundation with reinforcement is poured on top of it. The top of the foundation must match the level of the floor and be perfectly horizontal!
On top of the foundation, you need to lay another layer of waterproofing, and on it - a metal sheet. The dimensions of the sheet should exceed the projection of the stove by 10-15 cm. Moreover, from the side of loading firewood, it is better to make a larger release. Then random sparks from the blower will fall not on the wooden floor, but on the metal.
During operation, the stove for giving heats up quite strongly. If the nearby wall is made of wood or other flammable materials, it must be protected with thermal insulation. The simplest protection can be an asbestos sheet painted with heat-resistant paint or covered with a thin plaque. Open asbestos should not be kept, as its dust is considered very dangerous for inhalation. Instead of asbestos, a do-it-yourself dacha stove can be isolated from wood with a hard mineral wool slab. The material must be heat resistant. Facade construction wool is not suitable for this, because it has a too low temperature limit.
The country stove is built on clay, not on cement. Clay mortar is prepared from good clay and clean river or sea sand. If the clay is not purchased, but dug somewhere in the neighborhood, then it is worth first checking its quality. To do this, we make several test batches with different proportions of clay and sand. We roll the finished clay dough into small balls, rollers, cakes, and leave to dry for two weeks at room temperature.
Dried products must be tested: thrown from a height of human growth, try to crush them with a plank under the weight of a weight, etc. The composition of the most durable clay sample is taken as a standard. In the figure below, the best batch corresponds to samples "b".
A do-it-yourself stove for a summer residence is built from pre-soaked bricks! To do this, it is kept in water for at least 8 hours. During this time, all the air will come out, and the clay will be good to take on the brick in the masonry. Clay needs to be prepared quite a bit, so that approximately 20-25 pieces are enough for laying. bricks. Without the necessary experience, you can’t put more at a time. The thickness of the clay mortar in the masonry should not exceed 5 mm.
In order for the oven in the country, laid out with your own hands, to serve for a long time, each row should be checked for right angles and the horizontalness of the surface. The laying sequence is visible on the ordering drawing.
The cast-iron doors of the blower and the combustion chamber are fastened with steel wire, which is walled up in masonry. The cuts are made by a grinder. In extreme cases, you can do it the old fashioned way - with a bricklayer's hammer, but at the same time, a lot of waste is possible for marriage. The area under the grate should be slightly larger than the dimensions of the grate itself. Then, when heated, the metal will not move the brick.
The solution is applied to the wet brick. Experienced stove-makers do this not with a trowel, but with their hands. A good solution is as easy to apply as soft butter is spread on bread.
If during laying the brick sank lower than necessary, it should be removed, the mortar cleaned and laid on a fresh one. Otherwise, the new stove in the country will smoke heavily and let soot through. Unlike cement, it is absolutely impossible to move a brick along a clay mortar!
When building a stove for a summer house, try to make the inner walls as smooth as possible. Then soot will not linger on them, and it will be easier and less likely to need to be cleaned. Outside, the country stove should also be neat and beautiful. External seams should be carefully embroidered with embroidery or with your finger. In places where vaults and horizontal partitions are formed, there should also be no gaps. It is better to lay such rows slowly, one per day, so that the lower rows have time to grab, while the upper rows do not crawl.
Despite their small size and simple design, brick country stoves are very popular for small houses, as they show very good results. They heat up quickly and are warm enough to last all day. A small brick oven for a summer residence is notable for its low cost and availability for self-production, but with permanent residence in the winter, it will have to be heated twice a day - in the morning and in the evening.
Scientific progress does not stand still, and building materials and technologies are constantly being improved. But, nevertheless, sometimes you really want to remember the “well-forgotten old”. A brick stove for a summer residence is not only a unique coziness and comfort in the house, but also significant energy savings for heating a small country house.
Many believe that the construction of the furnace should be trusted only to professionals. In some ways, they are right, but if you wish, it is quite possible to build a small wood-burning stove yourself. In this article, we will consider how, using the knowledge and experience of our ancestors, we can build a wood-burning stove in the country from natural materials with our own hands.
For the construction you will need the following building materials and tools:
Important. The durability and strength of brickwork depends on the fat content and plasticity of clay. Ideally, the clay for laying the stove should lie down in the open air for two years. Under the influence of rain, snow, sun and wind, the clay becomes more homogeneous, more plastic, and stoves made from such clay are much stronger and “warmer”. This little trick was known to our ancestors and skillful stove-makers a hundred years ago.
In the course of describing the masonry process, we will figure out what all these building materials are intended for.
There is a certain procedure for carrying out construction work. A compact brick oven in the country can be built independently in about a month. Where to start?
When laying a foundation tape for a future stove, it is necessary to determine the depth of soil freezing in a given area. Since the depth of the foundation should be below the frozen soil layer. In the northern regions and central Russia, the average depth of the trench is from eighty centimeters to a meter.
If the foundation is being built in an already built house with an insulated foundation perimeter, then the depth of the trench can be from thirty centimeters to half a meter.
Since the main danger for any foundation is moisture. To waterproof the foundation, doing the work with your own hands, you can use the following folk method.
When a wet foundation freezes, it deforms and collapses. If wet soil freezes to the foundation concrete at low temperatures, then the side surface will be pushed out with a force equal to twenty-five tons per square meter.
To prevent the destruction of the foundation, do the following:
Such insulation prevents freezing of the outer perimeter of the furnace foundation with soil.
In order for the house to be warm and dry, the foundation must also be waterproofed. The instruction for the construction of foundations recommends two layers of waterproofing.
The first layer is placed along the border of the connection between the foundation and the soil. It is necessary to prevent the access of moisture from the soil to the foundation. The second layer should protect the base of the oven from moisture coming from the subfloor.
A layer of roofing material must be laid on a screed from a cement solution (composition 1 to 2). The surface of the entire foundation must also be protected with a cement screed with the addition of special water-repellent additives.
You can also increase the heat transfer of the stove if you put it on brick posts. Thus, organizing an empty space between the bottom of the furnace and the foundation. A more energy-efficient option is to install the stove on a series of metal pipes with a diameter of 100 millimeters, increasing the heated area.
It is recommended to build brick stoves for summer cottages from high-quality (without cracks and chips) red brick. It is not recommended to use burnt or unburnt clay or silicate bricks. Before starting laying, the bricks are soaked until the air bubbles stop escaping from the material. This is necessary for better adhesion.
The mortar for laying the furnace consists of a mixture of clay and fine sand at a rate of one to one. With increased fat content of clay, sand is added a little more. Clay before kneading is soaked for several days with rain, snow or river water. It is believed that such water is more "warm".
The old composition for laying furnaces recommends the use of fine slag, carefully sifted beforehand. If you add two more glasses of metal filings, then the strength of the masonry increases several times, and the heat transfer increases significantly even with a minimum of fuel.
The blower must correspond in size to the dimensions of the furnace and provide the flow of air for combustion, as well as accommodate the daily volume of ash. The grate has a square shape and is mounted at an angle to the firebox door.
This arrangement ensures complete combustion of the fuel and separation of smoke from the flame. From the grate to the walls of the furnace, the instruction recommends laying out slopes. This ensures that the coals roll onto the grate.
Wood-burning brick stoves for summer cottages usually have a firebox depth of at least 350 millimeters and a height of 420 millimeters. This is due to the average size of logs for the firebox.
The number of rows and sequential installation of all elements of the furnace is indicated in the diagram. More detailed information on laying walls can be viewed in the video materials on our website.
There are several professional tips for increasing the heat output of the stove, passed down by stove-makers from generation to generation:
This article shows only some of the professional subtleties of laying stoves, although professionals have a great many of them.
If you are more interested in the heat from the stove, and not its spectacular appearance, then you should stop at the old way of decorating the walls of the stove. The walls are plastered with clay mortar, adding a little cement to it. The mortar for plaster should have a creamy consistency.
Important. Preheated walls are plastered, even hot.
After plastering the walls, the brick oven in the country house is treated with chalk (whitened). Whitewash solution consists of a mixture of chalk, water and milk. All cracks in the plaster are also covered with chalk, which is mixed with milk to a thick solution. This ensures that the whitewash will not crack and crumble during operation.
If you apply all the above tips when building a stove, then in country house will always be warm and cozy. And in the presented video in this article you will find additional information on this topic.
Every summer resident has a dream to have a stove in his dacha in a cozy house. Having made a decision and putting a little effort, you can build a small oven in your house with your own hands. A small brick oven does not take a lot of time and is available without special skills
When laying a baby stove, you do not need to install a foundation, as it is light in weight.
The oven area will take 0.4 m². It will be laid out of brick, which will be placed on edge or flat. The baby oven, despite its size, will be able to give off and retain heat. For such a furnace, it is not necessary to build a foundation, since it will not have much weight. It is enough to have a thick board floor, which will be well fixed on the logs.
Such a brick stove can easily replace a potbelly stove, and its functionality will be much richer.
It will be able to combine the cooking function (it will have a cast-iron stove), as well as the heating function (the presence of a chimney), in addition, it can be used as a fireplace, as there is a smoke tooth.
The laying of the furnace is so fast that, having started work in the morning, in the evening you will already be conducting a test furnace. At the very beginning, it is recommended to drown with the help of wood chips and paper, since due to a sharp temperature drop, cracks can appear on the masonry mortar that has not completely hardened. Such an outcome can create additional air leakage or smoke. Therefore, in order to use logs for heating, you need to wait for the solution to dry completely, this can take about a week.

So the little brick oven is ready. The doors are left open for a couple of weeks to dry.
Brick ovens for summer cottages are especially relevant for owners of non-gasified land plots. A good wood or charcoal brick oven will not only heat and help cook food, but also create a cozy atmosphere in the house.
Skillful stove-makers have always been worth their weight in gold, and nowadays their services are also not cheap. Building a furnace, taking into account the cost of materials, can become an overhead measure.
The way out in this situation is to build a furnace yourself. With minimal skills and desire, this work is up to many people living in the country.

The simplest and most affordable design is a metal stove, the so-called potbelly stove. It quickly heats up itself and warms up the room, but after the furnace stops, it cools down just as quickly and does not store heat.
A more perfect option is to make a brick potbelly stove. A small brick oven for summer cottages will heat a small room and be able to retain heat for a longer period. For the device of the furnace you will need the following materials:
You will also need a steel wire of small diameter and a piece of sheet steel 4-5 mm thick. If you have all the materials, you can start building with your own hands.
When preparing the solution yourself, the sand must be sifted through a fine sieve. Clay should be soaked in a container of water about a week before the start of work and mixed periodically. It is also desirable to pass the resulting clay milk through a sieve so that lumps of non-soaked clay do not get into the solution. The prepared solution should consist of sand to the touch. A cake from a solution, dried in the sun or in a warm place, should not crumble from a slight mechanical impact and crack. In the presence of such phenomena, it is necessary to change the ratio of sand and clay in the solution.
Back to index

The duration of operation of the furnace, first of all, depends on its basis. A wooden floor, even if made of thick boards, cannot provide a stable position due to thermal expansion and changing humidity. Within a short period of operation, brick kilns begin to diverge at the seams, traction deteriorates and other undesirable phenomena occur. The best option is to build a foundation for the furnace.
In dachas, the width of the foundation should be 20-25 cm larger than the overall dimensions of all types of installed stoves.
After choosing a place to install the stove, the wooden floor, if available, must be dismantled. Depending on the depth of the underground, you may have to dig a small pit. The total height of the foundation and the pillow under it must be at least 30 cm. The earth and the layers of sand and gravel that are poured must be carefully tamped. On the prepared place you need to install the formwork of the required size. The height of the formwork should be 5-7 cm higher than the floor surface. Before pouring concrete, it is desirable to reinforce the space with a metal mesh. After completion of all preparatory work, concrete can be poured. After hardening, you need to remove the formwork, give about a week's exposure time to set the fortress. Then you can proceed to the device of the stove for giving.
Back to index

Before starting laying on the surface, it is necessary to arrange a waterproofing layer from a piece of roofing material or similar material laid on the mastic. For work you will need:
If the cottage does not have running water, you need to prepare and fill a container with the necessary supply of water.
When cutting a brick with a grinder, it is advisable to choose a blind corner or arrange a small shelter from the film so that the fine dust formed during operation does not cover the entire cottage.
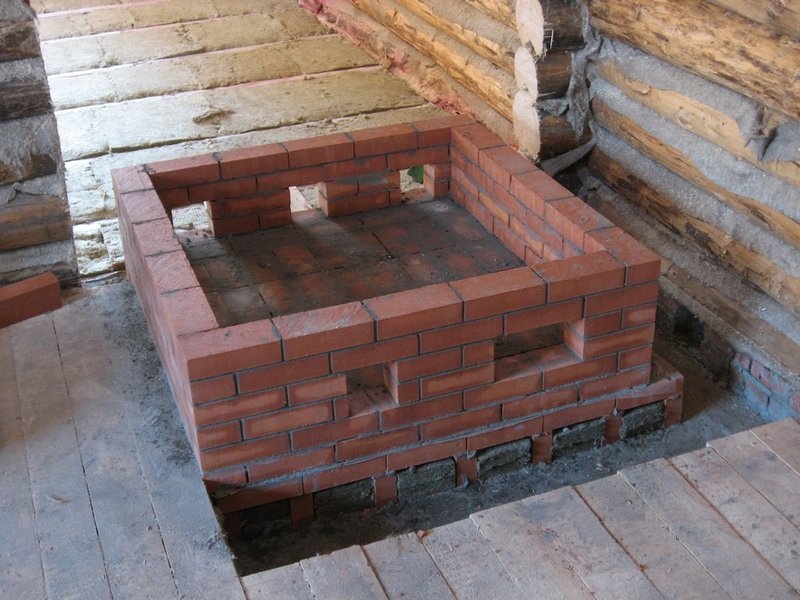
First, you need to place the bricks of the first row on the base, align all the corners and check the level in all directions. After that, you can lay out the first row on the solution. No solution is applied between the base and the first row.
![]()
Before laying the second row, it is necessary to install a blower door. The fastening of the door is made of wire threaded through special holes and laid between the bricks. It is desirable to wrap the door around the perimeter with an asbestos cord or a strip cut from sheet asbestos. After laying the second and third rows, you need to install a grate.
Above begins the combustion chamber. On the fourth row you need to install a door for the firebox. The installation technology is similar to the installation of the blower door. Bricks of the fourth row must be installed on the end. For this and subsequent rows, it is desirable to use fireclay bricks. On the fifth row, the brick in the furnace area is laid flat, in the chimneys - butt. The sixth row is the last one in which the brick must be laid end-to-end. In the back wall, the bricks are stacked in two rows. The laying of the seventh row is similar to the sixth.
Bricks of the eighth row should block the firebox door. On the back wall you need to install a brick with a bevel, which will direct the flame to the burner.
A hob is laid on the ninth row. To seal the joints around the perimeter, you need to lay a strip of sheet asbestos.

After installing the hob, you need to proceed to the formation of the chimney. After laying the eleventh row, a damper should be installed on the chimney. Asbestos gaskets must be laid at the joints on both sides and coated with a solution. After installing the valve, it is necessary to lay out two or three more rows of bricks. Then a metal pipe can be docked to the brickwork. When installing the pipe, it is necessary to maintain fire gaps when passing through combustible surfaces. It is desirable to insulate the pipe with a layer of mineral wool 150-200 mm thick.
A simple country stove is ready, but it needs to be dried. To speed up the drying process, you can install an incandescent light bulb with a power of 75-100 W in the furnace. The doors of the blower and firebox must be left open. After a significant reduction in the formation of condensate on metal parts, the furnace can be gradually heated, first burning paper and wood chips. After two or three light fires, firewood can be laid.
Finishing the stove is desirable to perform after the season of operation. During this time, cracks and other defects may form, which must be repaired before finishing. For finishing, it is desirable to use the same solution as for masonry. You can apply with a trowel or spatula, smoothing and rubbing with a grater. For the final finish, you can use ceramic tiles or just whitewash.
One of the ovens


Materials and tools for building a furnace:
Materials:
- red brick 500 pieces and plus 600 more pieces for the pipe;
- red clay (you will need 6-8 buckets);
- 0.5 cubic meters of sand;
- 3-4 bags of cement;
- water.

The reliability of the furnace directly depends on the selected brick. First of all, it must be durable, otherwise the oven will not last long. The strength of a brick can be determined by its color, if it has a purple hue, it means that the brick has been burned. If the brick is orange, then it is likely that it was burned too lightly. If you hit a high-quality brick with a hammer, you should hear a clear sound, and the color of such a brick is pink.
The author recommends using Vitebsk brick for such works. The bricks should not have chips and cracks, at least they are not desirable. It is also good that all the bricks are the same size. If it so happened that defective bricks came across during the purchase, they should not be used in the construction of the chimney and firebox.

Furnace assembly process:
Step one. Laying out the first row
First you need to lay out the first row of bricks on the prepared foundation. The result should be a regular quadrilateral. Accuracy is extremely important here, as this will determine how evenly the entire furnace will be built. The first layer is first laid without mortar, the horizontalness of the row can be checked with a level. It is important to note that each row is assembled strictly according to the drawings created earlier. The author got only 20 rows.


Step two. Waterproofing
At the next stage, the author makes waterproofing, roofing material is suitable for such purposes. You will need three layers in total. The material is placed on top of the laid out row of bricks. Well, after that, you can start laying out the second row of bricks, which, according to the rules of masonry, is usually called the first. When laying out each row, it is important to check its horizontalness.


After the twentieth row is laid out, a 55 × 55 mm corner is installed above the cooking oven door. Further, from the same corner, a frame is installed with the edge up, as well as a sheet of the exhaust channel 2 mm thick (hole 120X120 mm)


To hide the gap between the floor and the first row of bricks, a subfloor metal sheet is installed. A plinth can be installed around the perimeter of the oven.
It is not recommended to heat the stove right away, it should be allowed to stand for about a week. After all, the slower the solution dries, the stronger it becomes. Then you need to slowly warm the oven with wood chips until it is completely dry. If you immediately heat the oven strongly, it may crack.
If there is a desire to protect the corners of the oven masonry, then they can be trimmed with a corner. In the same way, you can equip the cooking chamber from the inside.
Cabinetmaker. In 1921 he became one of the founders of the Communist...

Slavic culture, although different from Indian, and even more so from Tibetan, ...

History of Bohemia HISTORIA BOHEMICA Among the chronicles covering the history of the Czech Republic...